Konfigurasi Server Sistem Kontrol dan Monitoring Menggunakan CactiMenambahkan alamat repository debian 10 (buster)
root@ns1:~# pico /etc/apt/sources.list

#deb cdrom:[Debian GNU/Linux 10.0.0 _Buster_ - Official amd64 DVD Binary-1 20190706-10:24]/ buster contrib main

deb [trusted=yes] http://repo.smkn1klaten.sch.id/debian/buster/amd64/ /

deb http://ftp.debian.org/debian/ buster main contrib non-free
deb-src http://ftp.debian.org/debian/ buster main contrib non-free

# buster-updates, previously known as 'volatile'
# A network mirror was not selected during install.  The following entries
Update ke alamat repository yang baru
root@ns1:~# apt update
Ign:1 http://repo.smkn1klaten.sch.id/debian/buster/amd64  InRelease
Ign:2 http://repo.smkn1klaten.sch.id/debian/buster/amd64  Release
Ign:3 http://repo.smkn1klaten.sch.id/debian/buster/amd64  Packages
...
Get:13 http://ftp.debian.org/debian buster/contrib Translation-en [44.2 kB]
Get:14 http://ftp.debian.org/debian buster/non-free amd64 Packages [87.7 kB]
Get:15 http://ftp.debian.org/debian buster/non-free Translation-en [88.8 kB]
Fetched 25.4 MB in 32s (784 kB/s)
Reading package lists... Done
Building dependency tree
Reading state information... Done
Update konfigurasi BIND9
root@ns1:~# pico /etc/bind/db.sekolah
;
; BIND data file for local loopback interface
;
$TTL 604800
@ IN SOA sekolah.sch.id. root.sekolah.sch.id. (
2 ; Serial
604800 ; Refresh
86400 ; Retry
2419200 ; Expire
604800 ) ; Negative Cache TTL
;
@ IN NS sekolah.sch.id.
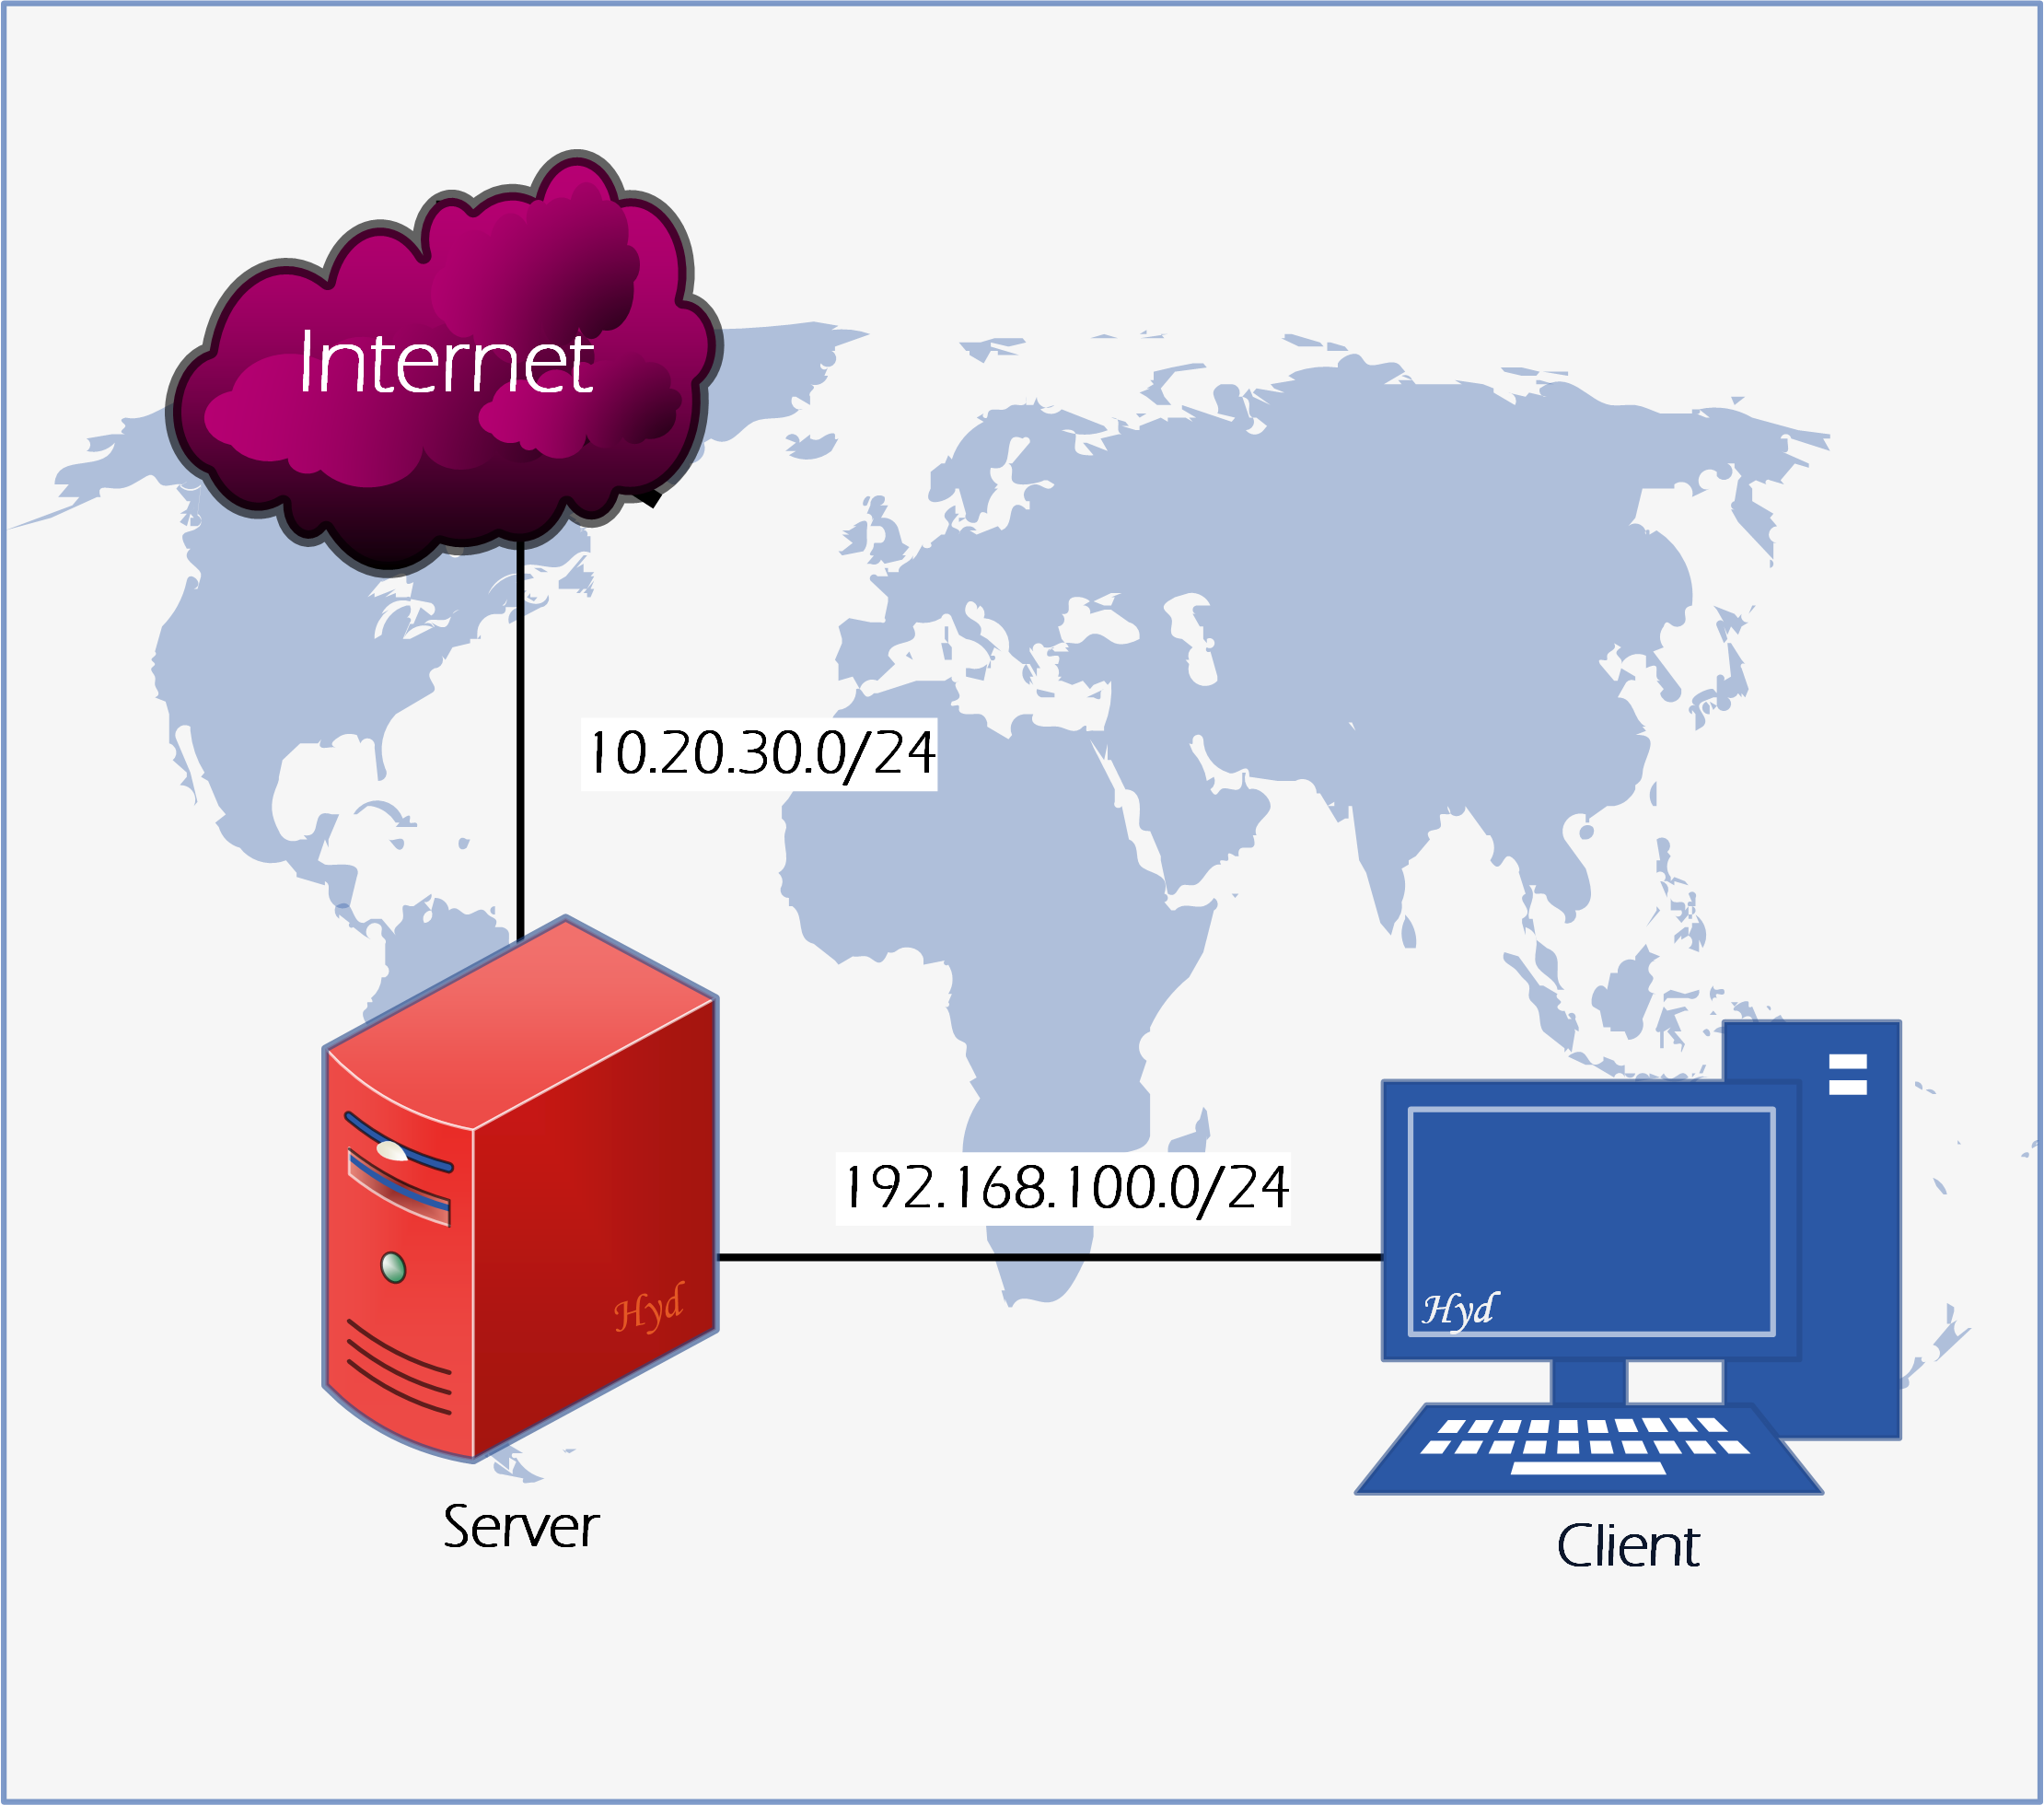
@ IN A 192.168.100.1
;@ IN AAAA ::1
ns1 IN A 192.168.100.1
www IN A 192.168.100.1
cacti IN A 192.168.100.1
root@ns1:~# pico /etc/bind/db.192

;
; BIND reverse data file for local loopback interface
;
$TTL    604800
@       IN      SOA     sekolah.sch.id. root.sekolah.sch.id. (
                              1         ; Serial
                         604800         ; Refresh
                          86400         ; Retry
                        2419200         ; Expire
                         604800 )       ; Negative Cache TTL
;
@       IN      NS      ns1.sekolah.sch.id.
1       IN      PTR     sekolah.sch.id.
1       IN      PTR     www.sekolah.sch.id.
1       IN      PTR     cacti.sekolah.sch.id.
root@ns1:~# service bind9 restart
root@ns1:~# nslookup cacti.sekolah.sch.id

Server:         127.0.0.1
Address:        127.0.0.1#53

Name:   cacti.sekolah.sch.id
Address: 192.168.100.1
Tunning database sesuai kebutuhan Cacti
Tambahkan script berikut ini di file “50-server.cnf” yaitu pada bagian [mysqld]
max_heap_table_size = 128M
tmp_table_size = 64M
join_buffer_size = 64M
innodb_file_format = Barracuda
innodb_large_prefix = 1
innodb_buffer_pool_size = 1GB
innodb_buffer_pool_instances = 10
innodb_flush_log_at_timeout = 3
innodb_read_io_threads = 32
innodb_write_io_threads = 16
innodb_io_capacity = 5000
innodb_io_capacity_max = 10000
Masih di file “50-server.cnf” pada bagian “collation-server”
Ubah dari
collation-server = utf8_unicode_ci
menjadi
collation-server = utf8_unicode_ci
root@ns1:~# pico /etc/mysql/mariadb.conf.d/50-server.cnf

# this is only for the mysqld standalone daemon
[mysqld]

max_heap_table_size = 128M
tmp_table_size = 64M
join_buffer_size = 64M
innodb_file_format = Barracuda
innodb_large_prefix = 1
innodb_buffer_pool_size = 1GB
innodb_buffer_pool_instances = 10
innodb_flush_log_at_timeout = 3
innodb_read_io_threads = 32
innodb_write_io_threads = 16
innodb_io_capacity = 5000
innodb_io_capacity_max = 10000

#
# * Basic Settings
#
# * Character sets
#
# MySQL/MariaDB default is Latin1, but in Debian we rather default to the full
# utf8 4-byte character set. See also client.cnf
#
character-set-server  = utf8
#collation-server      = utf8_unicode_ci
collation-server      = utf8_unicode_ci
#
Instal Apache dan PHP Extensions
root@ns1:~# apt install -y apache2 libapache2-mod-php php-xml php-ldap php-mbstring php-gd php-gmp php-mysql

Reading package lists... Done
Building dependency tree
Reading state information... Done
apache2 is already the newest version (2.4.38-3+deb10u4).
php-mysql is already the newest version (2:7.3+69).
The following additional packages will be installed:
  fontconfig-config fonts-dejavu-core libfontconfig1 libgd3 libjbig0 libjpeg62-turbo libtiff5 libwebp6 libxpm4 libxslt1.1
  php7.3-gd php7.3-gmp php7.3-ldap php7.3-mbstring php7.3-xml
Suggested packages:
0 upgraded, 21 newly installed, 0 to remove and 0 not upgraded.
Need to get 3,557 kB of archives.
After this operation, 9,409 kB of additional disk space will be used.
Get:1 http://repo.smkn1klaten.sch.id/debian/buster/amd64  fonts-dejavu-core 2.37-1 [1,068 kB]
Get:2 http://repo.smkn1klaten.sch.id/debian/buster/amd64  fontconfig-config 2.13.1-2 [280 kB]
...
...
Creating config file /etc/php/7.3/mods-available/gd.ini with new version
Setting up php-gd (2:7.3+69) ...
Processing triggers for libapache2-mod-php7.3 (7.3.19-1~deb10u1) ...
Processing triggers for man-db (2.8.5-2) ...
Processing triggers for libc-bin (2.28-10) ...
Seting Zona Waktu (Timezone), Memory limit dan maksimum waktu eksekusi
Edit pada file “/etc/php/7.3/apache2/php.ini”
root@ns1:~# pico /etc/php/7.3/apache2/php.ini

[Date]
; Defines the default timezone used by the date functions
; http://php.net/date.timezone
;date.timezone =
date.timezone = Asia/Jakarta

; Maximum amount of memory a script may consume (128MB)
; http://php.net/memory-limit
; memory_limit = 128M
memory_limit = 512M

; Maximum execution time of each script, in seconds
; http://php.net/max-execution-time
; Note: This directive is hardcoded to 0 for the CLI SAPI
; max_execution_time = 30
max_execution_time = 60
Lakukan hal yg sama pada file “/etc/php/7.3/cli/php.ini”
root@ns1:~# pico /etc/php/7.3/cli/php.ini

[Date]
; Defines the default timezone used by the date functions
; http://php.net/date.timezone
;date.timezone =
date.timezone = Asia/Jakarta

; Maximum amount of memory a script may consume (128MB)
; http://php.net/memory-limit
; memory_limit = -1
memory_limit = 512M

; Maximum execution time of each script, in seconds
; http://php.net/max-execution-time
; Note: This directive is hardcoded to 0 for the CLI SAPI
; max_execution_time = 30
max_execution_time = 60
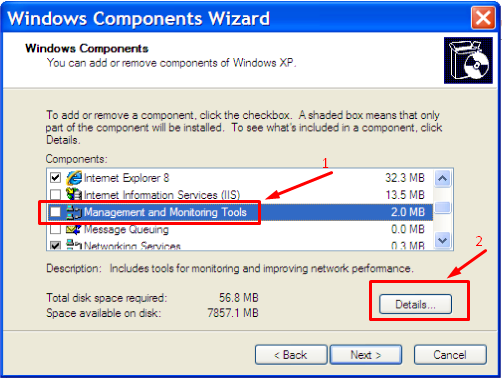
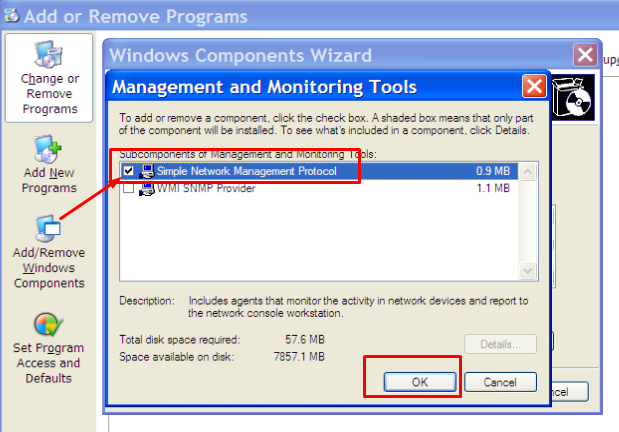
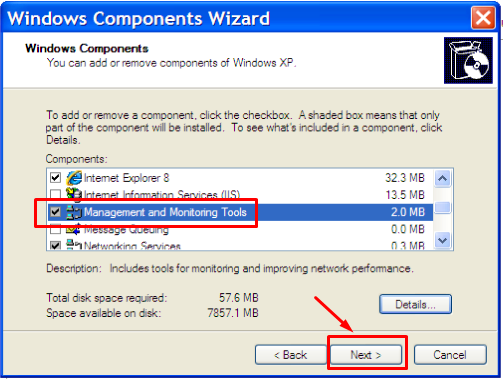
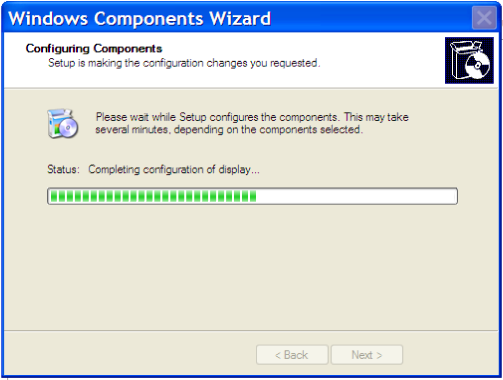
Instal SNMP
root@ns1:~# apt install -y snmp snmpd php-snmp rrdtool librrds-perl

Reading package lists... Done
Building dependency tree
Reading state information... Done
The following additional packages will be installed:
  fontconfig libcairo2 libdatrie1 libdbi1 libfribidi0 libglib2.0-0 libglib2.0-data libgraphite2-3 libharfbuzz0b
  libpango-1.0-0 libpangocairo-1.0-0 libpangoft2-1.0-0 libpixman-1-0 librrd8 libsensors-config libsensors5 libsnmp-base
  libsnmp30 libthai-data libthai0 libxcb-render0 libxcb-shm0 libxrender1 php7.3-snmp shared-mime-info xdg-user-dirs
Suggested packages:
Need to get 12.0 MB of archives.
After this operation, 34.9 MB of additional disk space will be used.
Processing triggers for libapache2-mod-php7.3 (7.3.19-1~deb10u1) ...
Processing triggers for man-db (2.8.5-2) ...
Processing triggers for libc-bin (2.28-10) ...
Membuat database untuk instalasi Cacti
Nama Database : cacti
Nama User : cactiuser
Password : cactipassword
root@ns1:~# mysql -u root -p

Enter password: [dbroot]

Welcome to the MariaDB monitor.  Commands end with ; or \g.
Your MariaDB connection id is 11
Server version: 10.3.27-MariaDB-0+deb10u1 Debian 10

Copyright (c) 2000, 2018, Oracle, MariaDB Corporation Ab and others.

Type 'help;' or '\h' for help. Type '\c' to clear the current input statement.

MariaDB [(none)]> create database cacti;
Query OK, 1 row affected (0.004 sec)

MariaDB [(none)]> GRANT ALL ON cacti.* TO cactiuser@localhost IDENTIFIED BY 'cactipassword';
Query OK, 0 rows affected (0.006 sec)

MariaDB [(none)]> flush privileges;
Query OK, 0 rows affected (0.004 sec)

MariaDB [(none)]> exit
Bye
User database yang baru (cactiuser) harus memiliki akses ke Tabel mysql.time_zone_name. Untuk melakukan itu, impor mysql_test_data_timezone.sql ke database mysql dengan perintah sebagai berikut
root@ns1:~# mysql -u root -p mysql < /usr/share/mysql/mysql_test_data_timezone.sql

Enter password: [dbroot]
Kemudian login ke MySQL dan berikan permission ke pengguna “cactiuser”
root@ns1:~# mysql -u root -p

Enter password: [dbroot]
Welcome to the MariaDB monitor.  Commands end with ; or \g.
Your MariaDB connection id is 13
Server version: 10.3.27-MariaDB-0+deb10u1 Debian 10

Copyright (c) 2000, 2018, Oracle, MariaDB Corporation Ab and others.

Type 'help;' or '\h' for help. Type '\c' to clear the current input statement.

MariaDB [(none)]> GRANT SELECT ON mysql.time_zone_name TO cactiuser@localhost;
Query OK, 0 rows affected (0.000 sec)

MariaDB [(none)]> flush privileges;
Query OK, 0 rows affected (0.001 sec)

MariaDB [(none)]> exit
Bye
Restart service MariaDB dan Apache
root@ns1:~# service mariadb restart
root@ns1:~# service apache2 restart
Instal Cacti
Download versi terbaru paket Cacti menggunakan perintah wget.
root@ns1:~# wget https://www.cacti.net/downloads/cacti-latest.tar.gz

--2021-01-31 13:05:32--  https://www.cacti.net/downloads/cacti-latest.tar.gz
Resolving www.cacti.net (www.cacti.net)... 172.67.196.107, 104.21.21.50, 2606:4700:3033::6815:1532, ...
Connecting to www.cacti.net (www.cacti.net)|172.67.196.107|:443... connected.
HTTP request sent, awaiting response... 200 OK
Length: 29197220 (28M) [application/octet-stream]
Saving to: ‘cacti-latest.tar.gz’

cacti-latest.tar.gz            100%[===================================================>]  27.84M  3.12MB/s    in 12s

2021-01-31 13:05:55 (2.26 MB/s) - ‘cacti-latest.tar.gz’ saved [29197220/29197220]
Ekstrak cacti-latest.tar.gz menggunakan perintah tar dan pindahkan hasil ekstrak ke direktori /var/www/
root@ns1:~# tar -zxvf cacti-latest.tar.gz
...
cacti-1.2.16/formats/cacti_group.format
cacti-1.2.16/formats/cacti_monitor.format
cacti-1.2.16/formats/index.php
cacti-1.2.16/formats/default.format
cacti-1.2.16/vdef.php
cacti-1.2.16/links.php
cacti-1.2.16/user_group_admin.php

root@ns1:~# mv cacti-1* /var/www/cacti
Import default data database Cacti ke database Cacti.
root@ns1:~# mysql -u root -p cacti < /var/www/cacti/cacti.sql

Enter password: [dbroot]
Edit file konfigurasi Cacti untuk menentukan jenis database, nama database, nama host MySQL, user database, dan password. Lakukan sesuai ketentuan sebelumnya
root@ns1:~# pico /var/www/cacti/include/config.php

/*
 * Make sure these values reflect your actual database/host/user/password
 */

$database_type     = 'mysql';
$database_default  = 'cacti';
$database_hostname = 'localhost';
$database_username = 'cactiuser';
$database_password = 'cactipassword';
$database_port     = '3306';
$database_retries  = 5;
$database_ssl      = false;
$database_ssl_key  = '';
$database_ssl_cert = '';
$database_ssl_ca   = '';

/*
Edit file crontab. Tambahkan entri berikut di crontab sehingga Cacti dapat melakukan polling setiap lima menit.
root@ns1:~# pico /etc/cron.d/cacti

*/5 * * * * www-data php /var/www/cacti/poller.php > /dev/null 2>&1
Konfigurasi VirtualHost untuk domain cacti.sekolah.sch.id
root@ns1:~# pico /etc/apache2/sites-available/cacti.conf
<VirtualHost *:80>
ServerName cacti.sekolah.sch.id
ServerAlias cacti.sekolah.sch.id
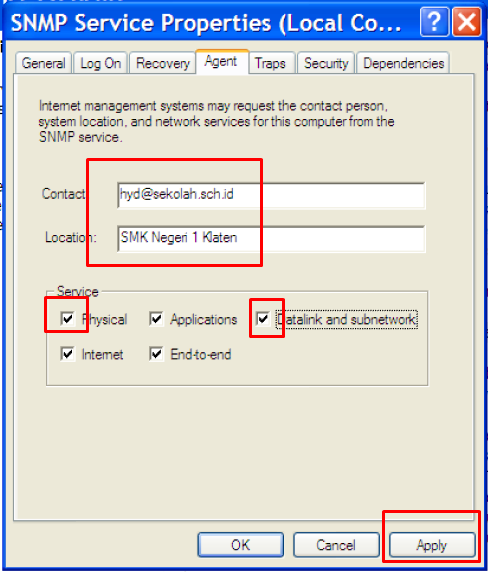
ServerAdmin hyd@sekolah.sch.id
DocumentRoot /var/www/cacti
Alias /cacti /var/www/cacti
<Directory /var/www/cacti>
Options +FollowSymLinks
AllowOverride None
<IfVersion >= 2.3>
Require all granted
</IfVersion>
<IfVersion < 2.3>
Order Allow,Deny
Allow from all
</IfVersion>
AddType application/x-httpd-php .php
<IfModule mod_php.c>
php_flag magic_quotes_gpc Off
php_flag short_open_tag On
php_flag register_globals Off
php_flag register_argc_argv On
php_flag track_vars On
# this setting is necessary for some locales
php_value mbstring.func_overload 0
php_value include_path .
</IfModule>
DirectoryIndex index.php
</Directory>
</VirtualHost>
Enable VirtualHost cacti
root@ns1:~# a2ensite cacti.conf

Enabling site cacti.
To activate the new configuration, you need to run:
  systemctl reload apache2
Restart service apache2
root@ns1:~# systemctl reload apache2
Buat file log dan izinkan pengguna Apache (www-data) untuk menulis data ke direktori Cacti.
root@ns1:~# touch /var/www/cacti/log/cacti.log
root@ns1:~# chown -R www-data:www-data /var/www/cacti/
Setup Cacti
Kunjungi URL berikut untuk memulai instalasi Cacti.
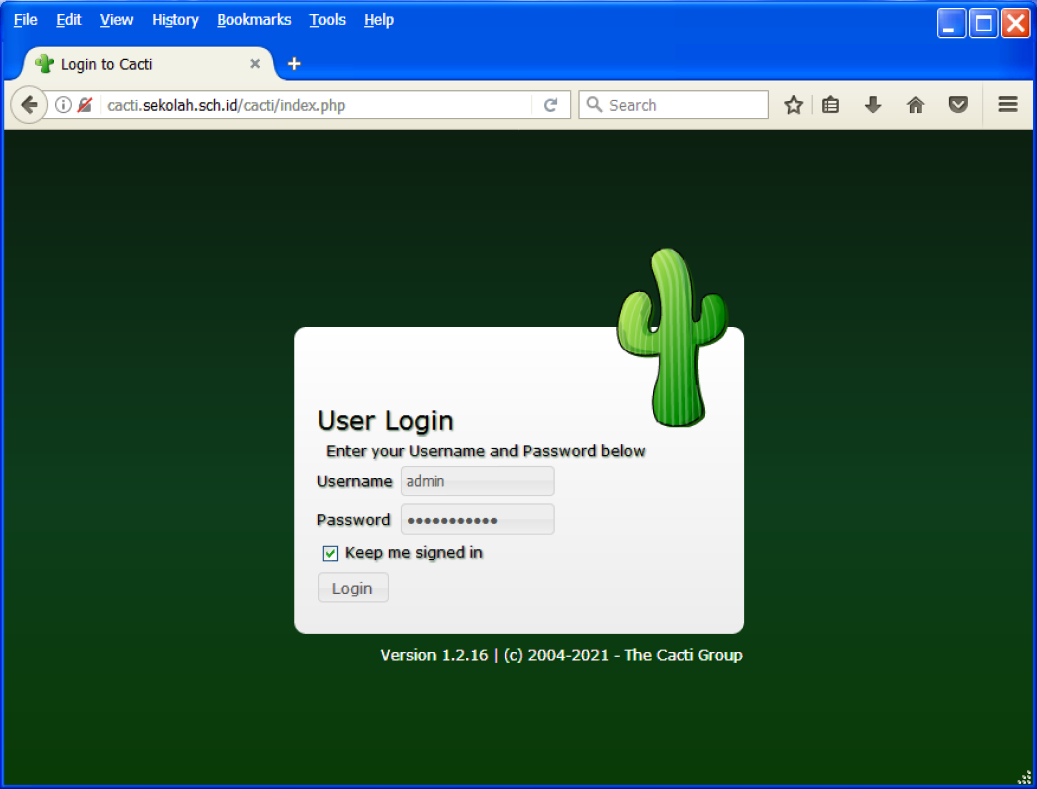
http://cacti.sekolah.sch.id
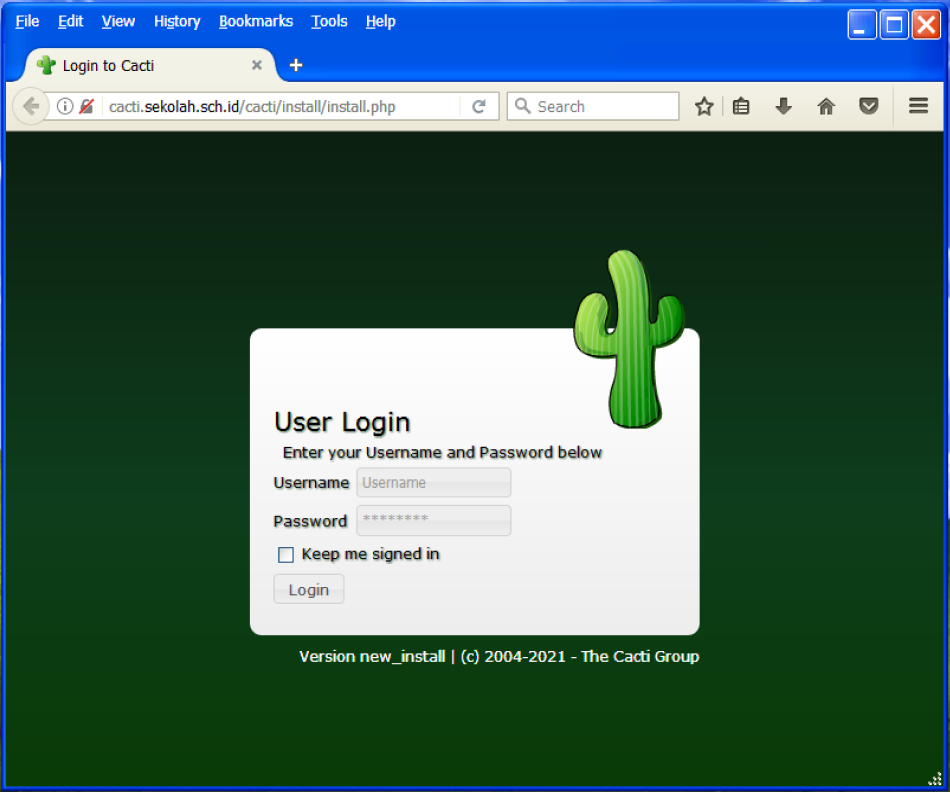
Masuk ke Cacti untuk mengatur instalasi Cacti
Username : admin
Password : admin
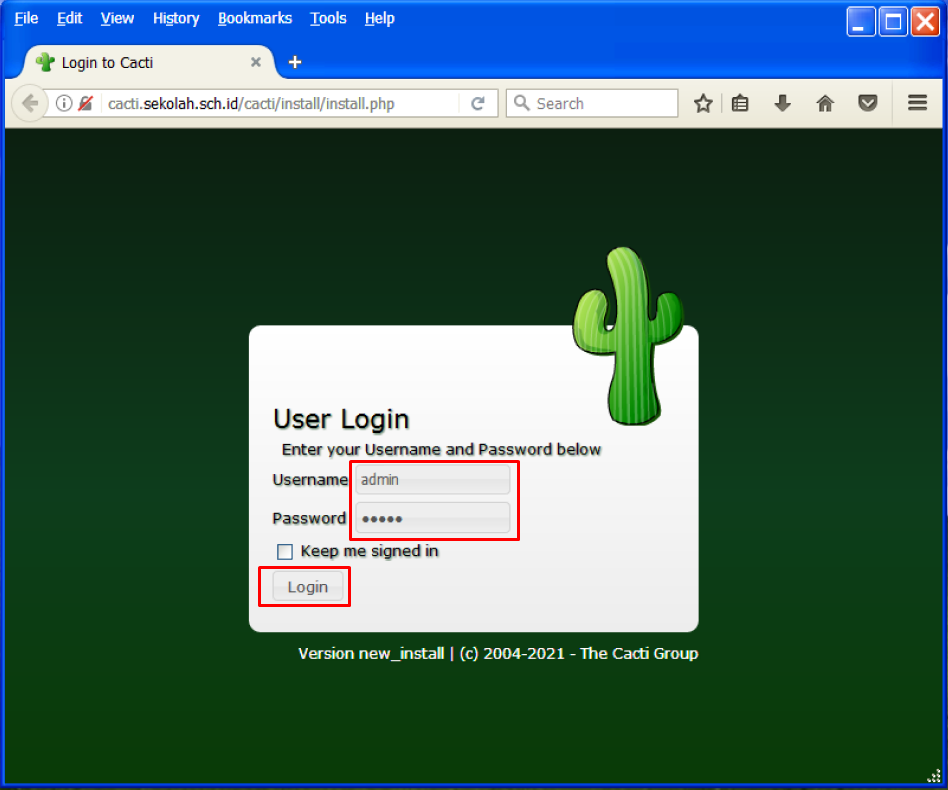
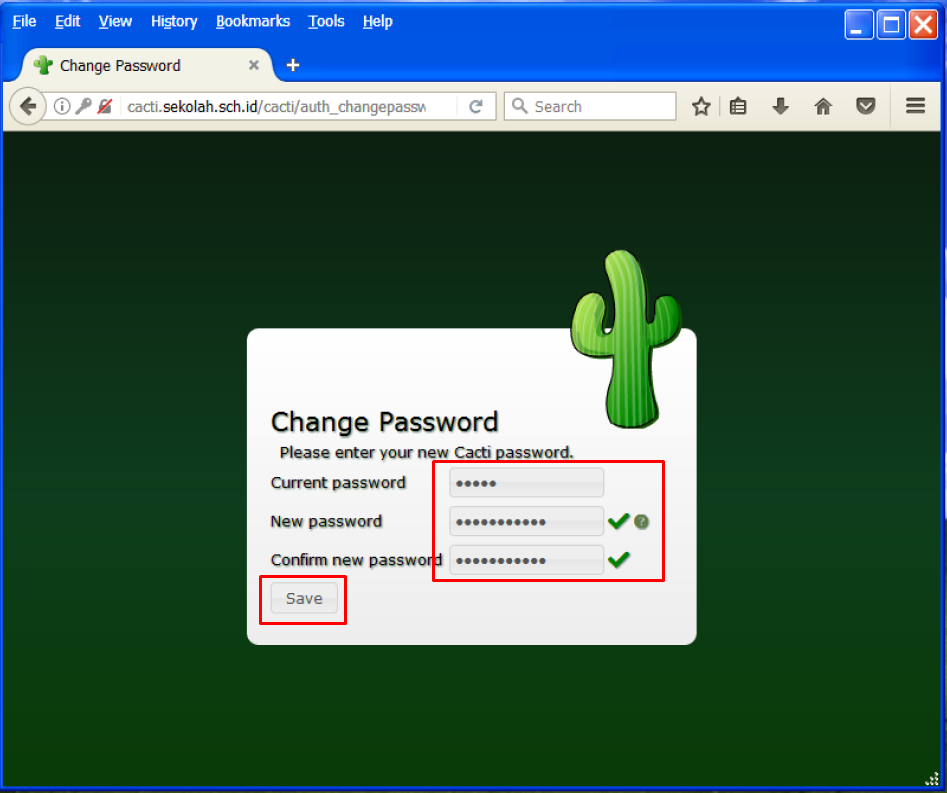
Kita harus mengubah password user “admin” terlebih dahulu sebelum mengatur Cacti.
Password minimal 8 karakter terdiri dari kombinasi huruf, angka dan tanda baca.
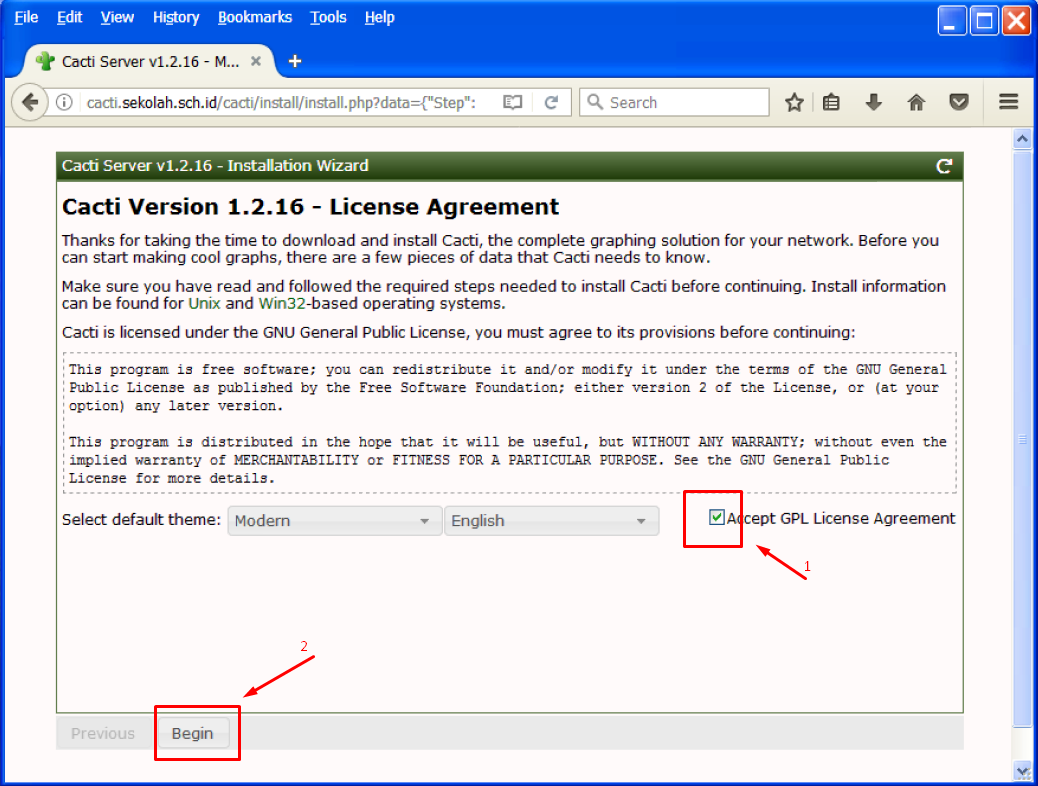
Terima perjanjian lisensi Cacti dan klik Next untuk melanjutkan.
Cacti melakukan pemeriksaan pra-instalasi dan melaporkan masalah apa pun di halaman ini. Jika terdapat masalah sebaiknya silahkan diperbaiki terlebih dahulu sebelum melanjutkan ke proses penginstalan.

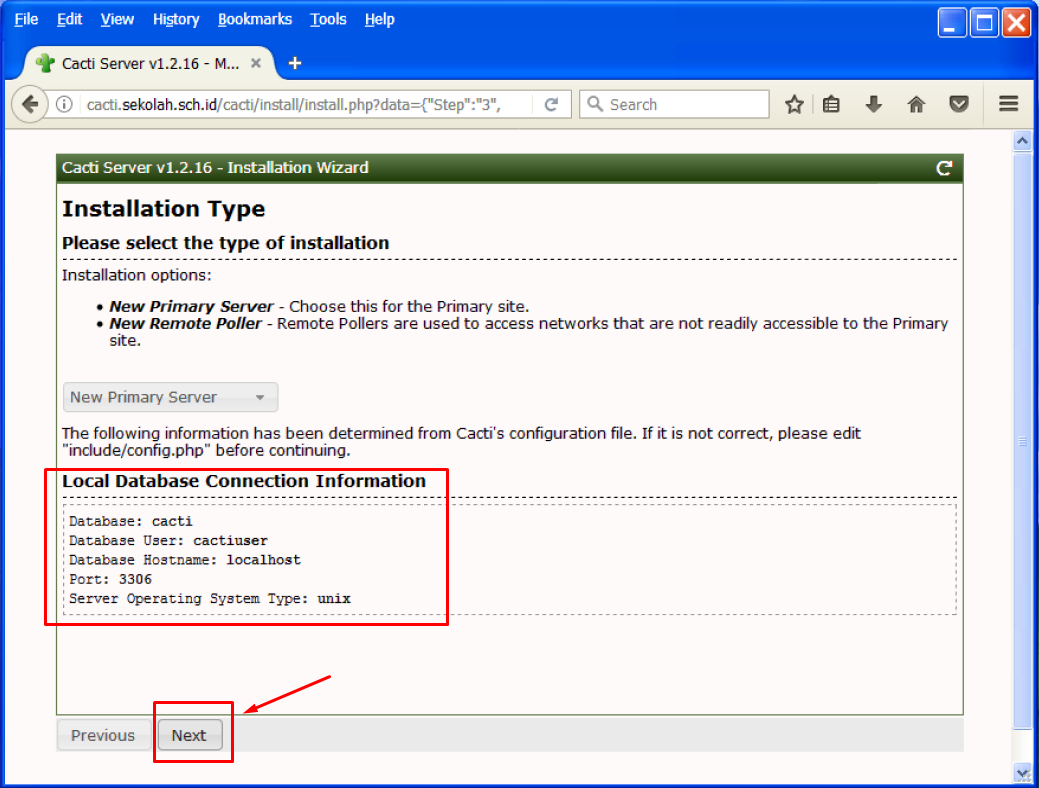
Pilih New Primary Server sebagai jenis instalasi untuk instalasi baru dan kemudian klik Next.
Wizard instalasi Cacti akan memeriksa dan melaporkan masalah permission atau hak akses direktori yang mungkin Ada pada direktori instalasi Cacti.

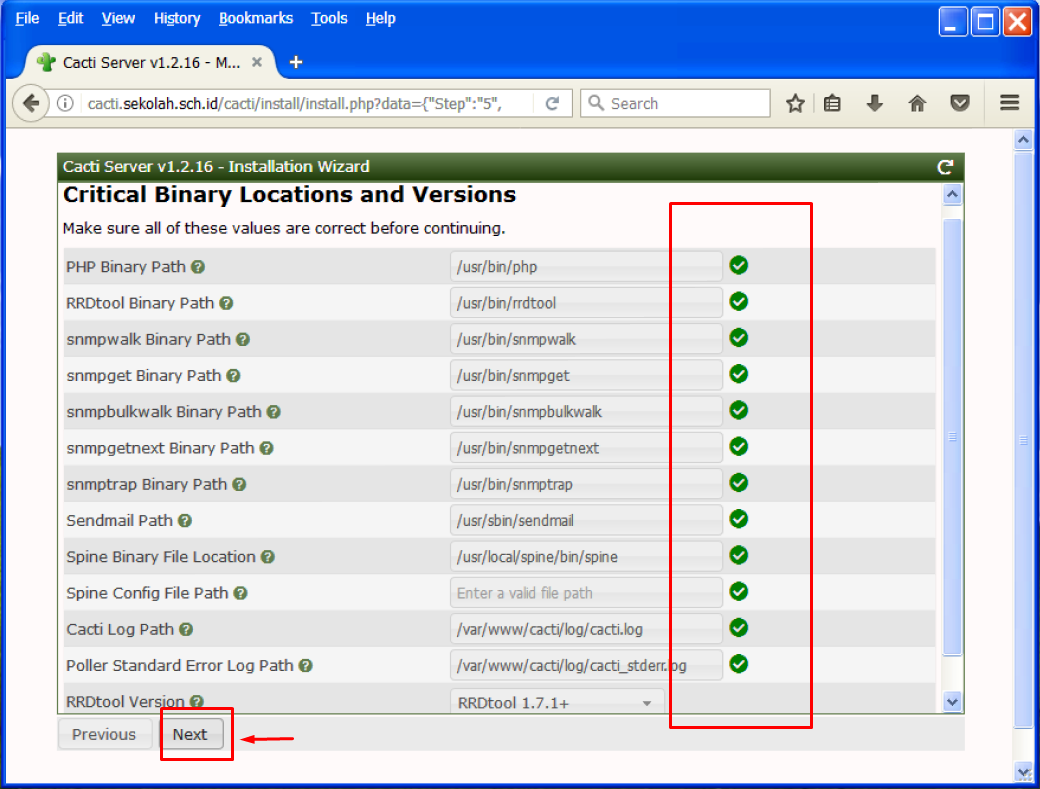
Wizard instalasi Cacti akan menunjukkan kepada kita, apabila ada paket yang hilang, yang wajib untuk Cacti.
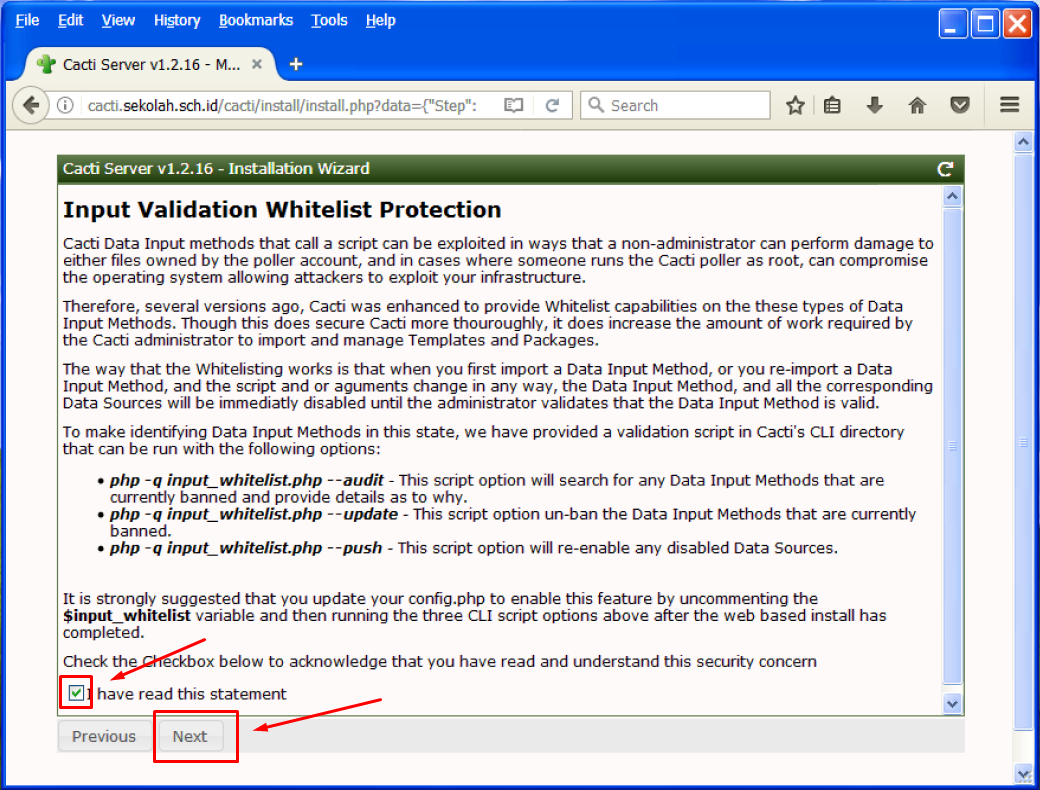
Ceklis pada kotak “I have read this statement”, kemudian klik Next
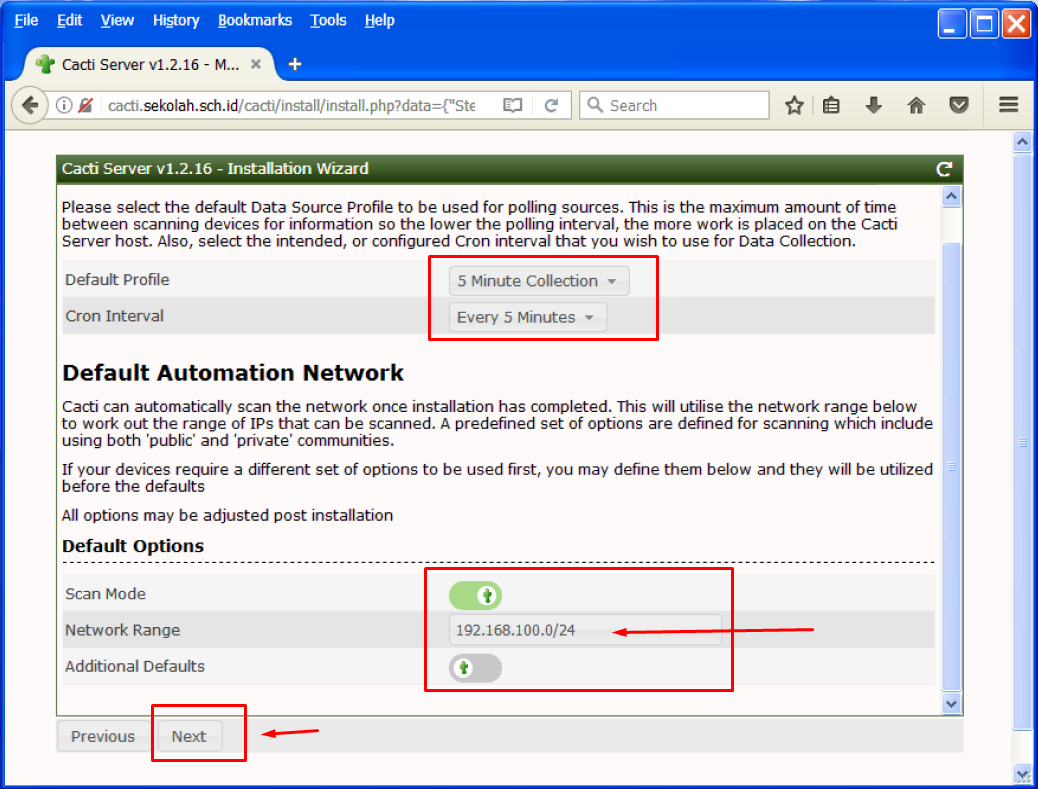
Klik Next saja, karena sebelumnya kita telah mengkonfigurasi cron untuk melakukan polling setiap lima menit.
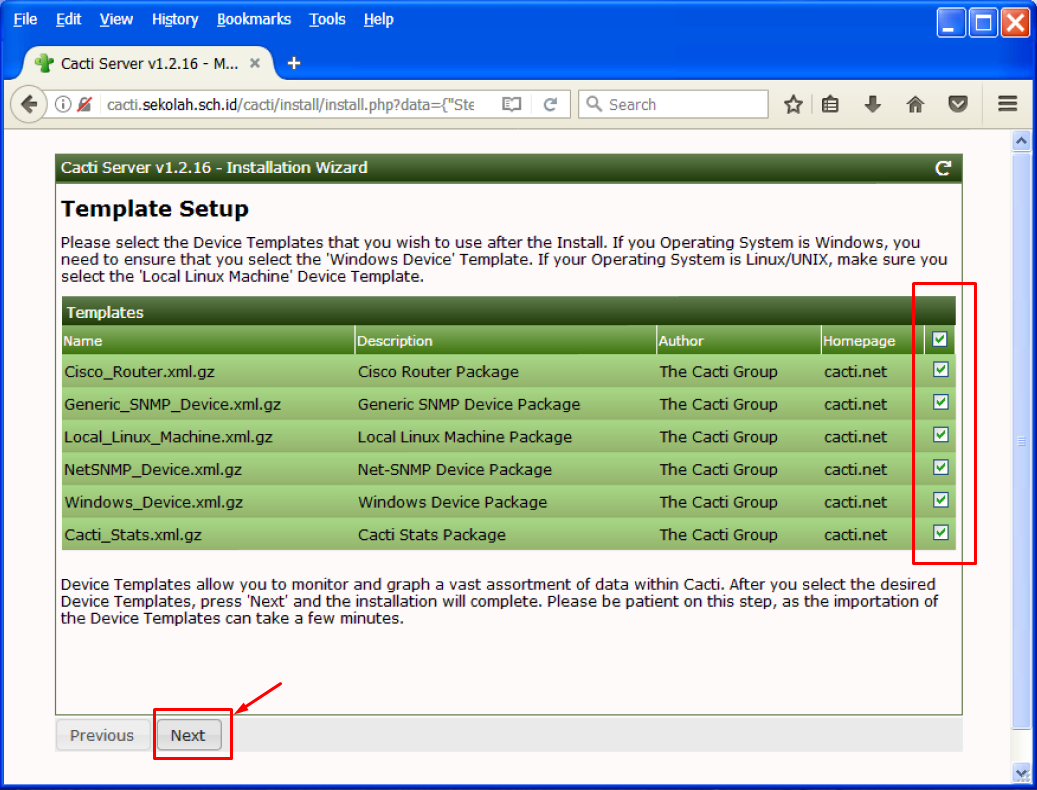
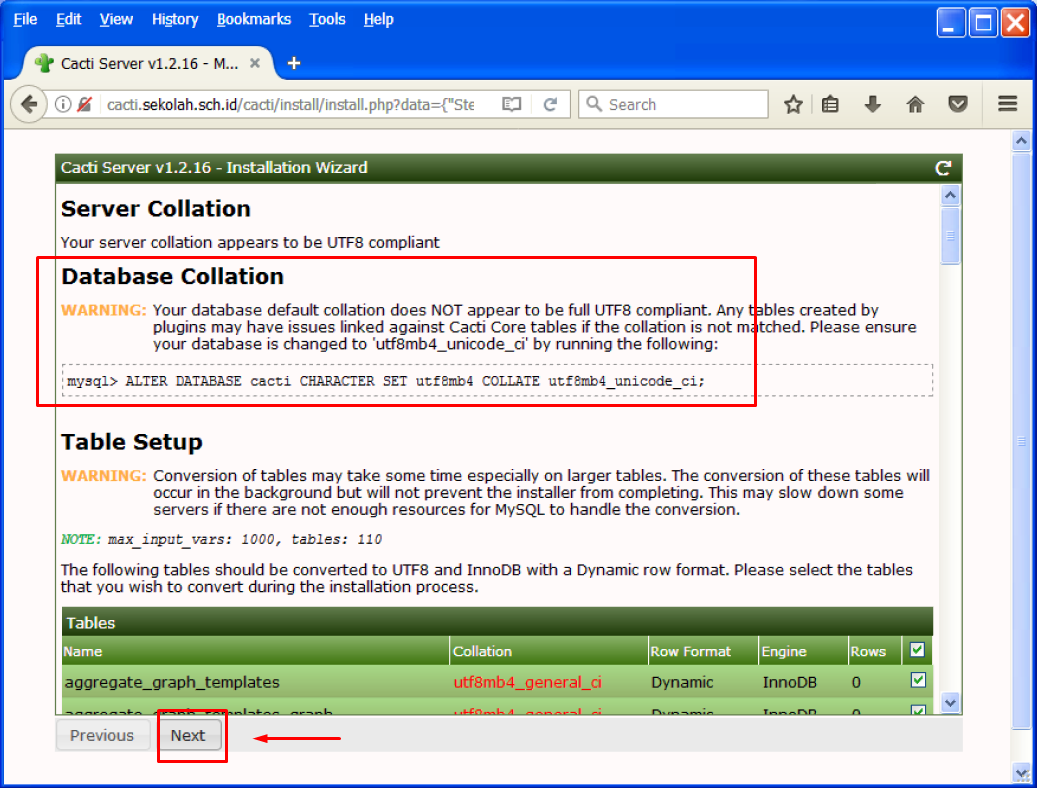
Pilih semua template atau yang kita inginkan saja, lalu klik Selesai untuk menyelesaikan proses penginstalan Cacti.
Klik Next untuk melanjutkan.
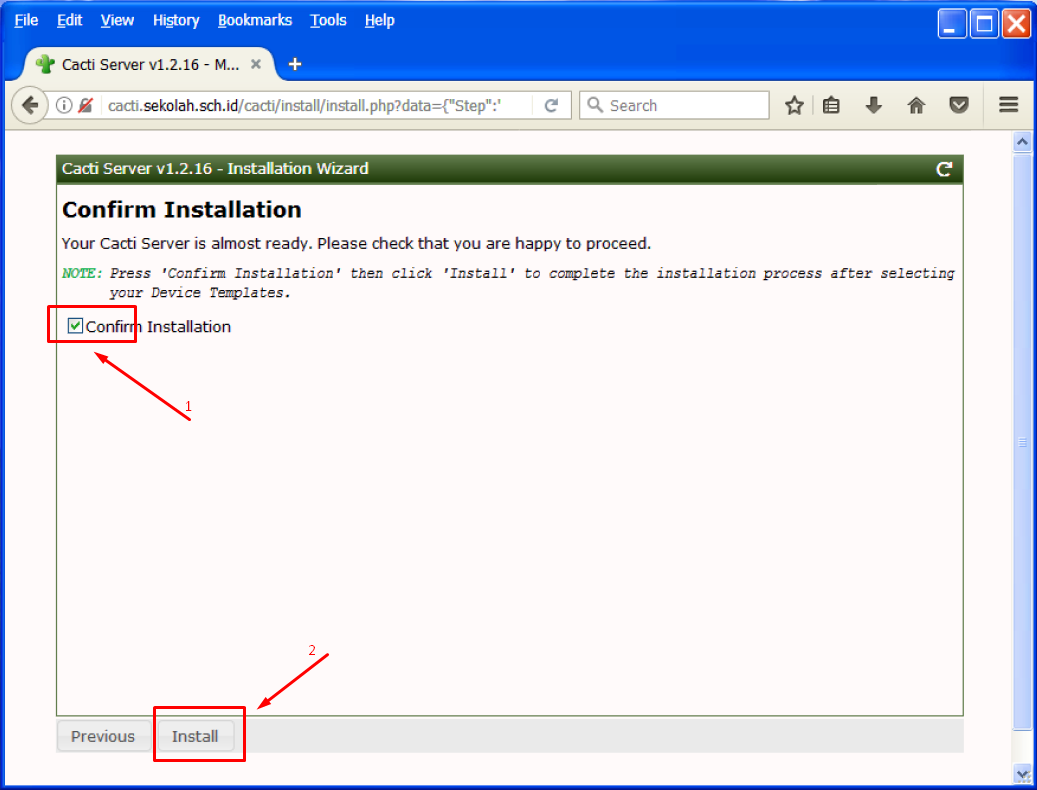
Ceklis pada Konfirmasi Instalasi dan tekan Instal untuk memulai instalasi Cacti.
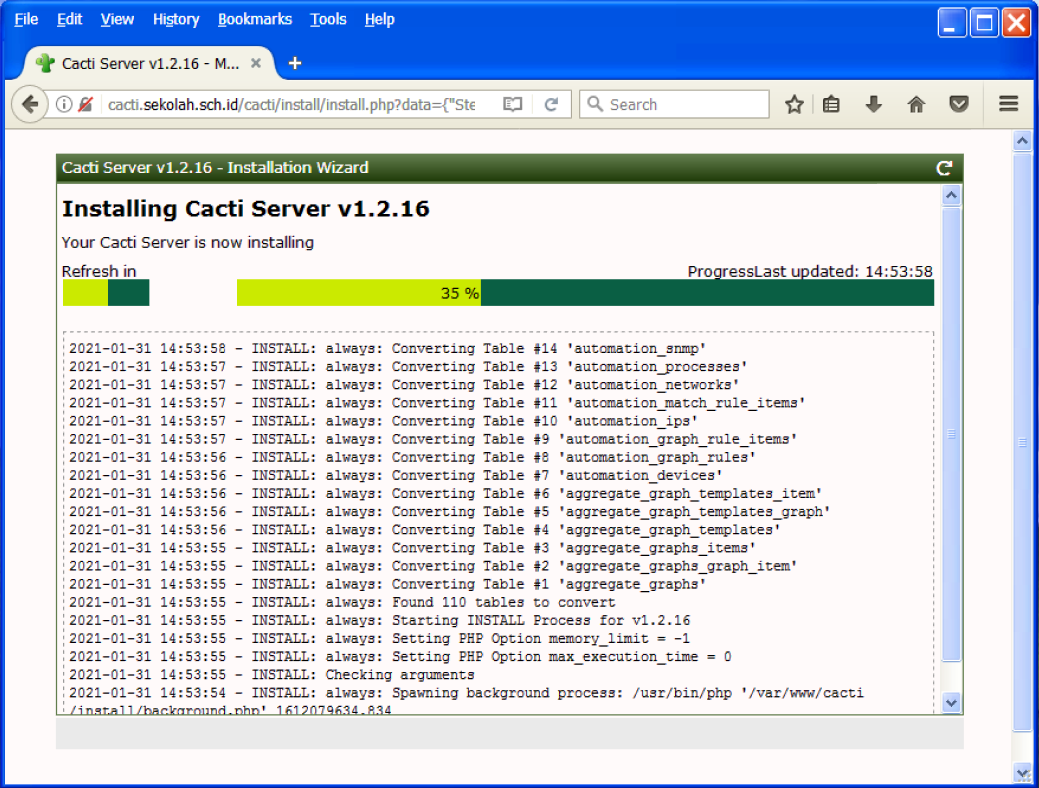
Dalam beberapa menit, penginstalan Cacti akan selesai.
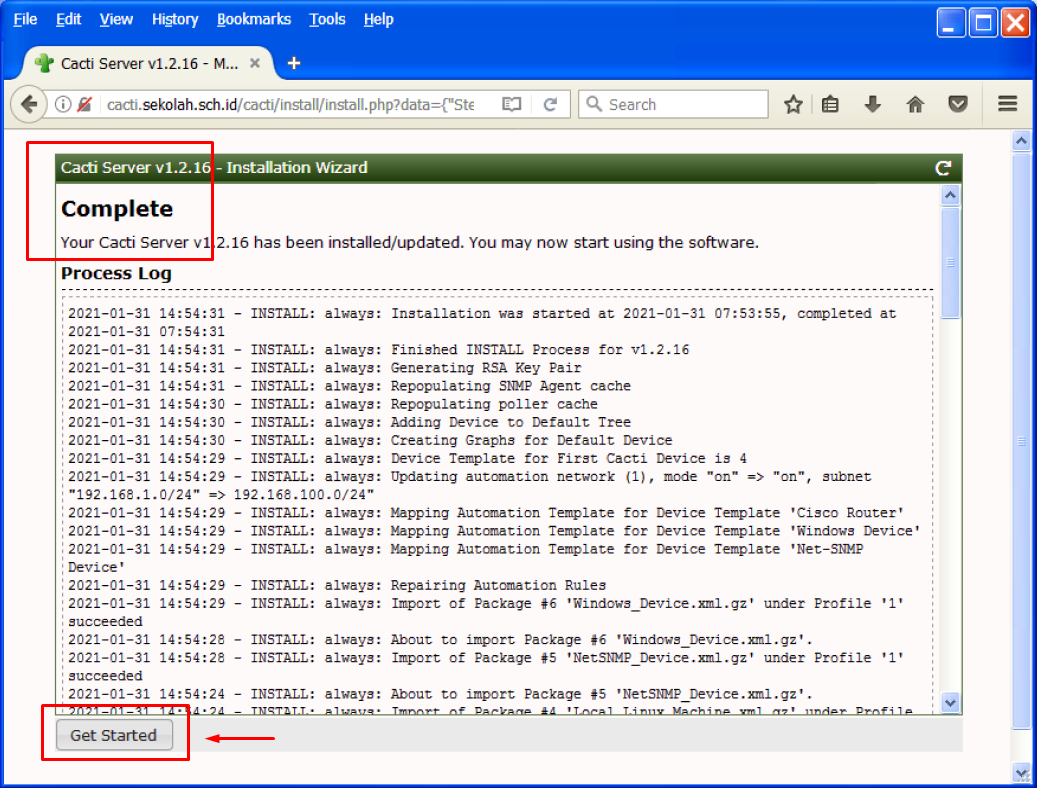
Klik “Get Started” maka akan langsung ke dasbor Cacti. Atau jika tidak, kita dapat masuk ke Cacti dengan user dan kata password yang telah dibuat sebelumnya pada saat proses penginstalan Cacti.
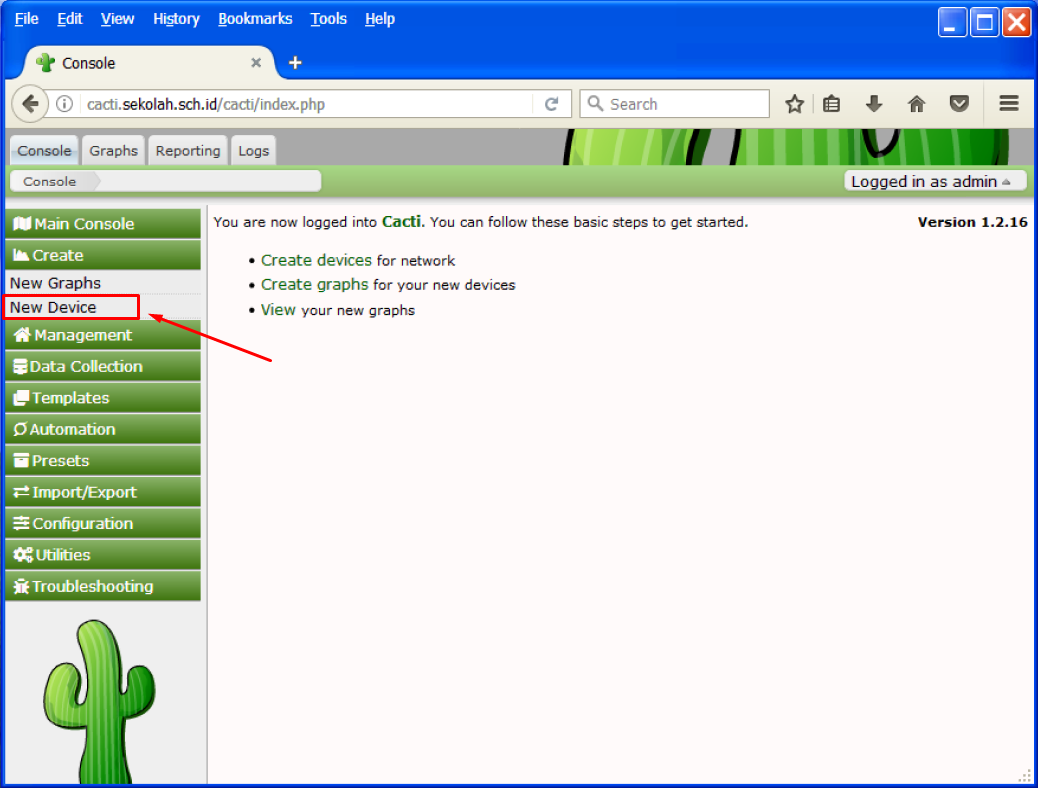
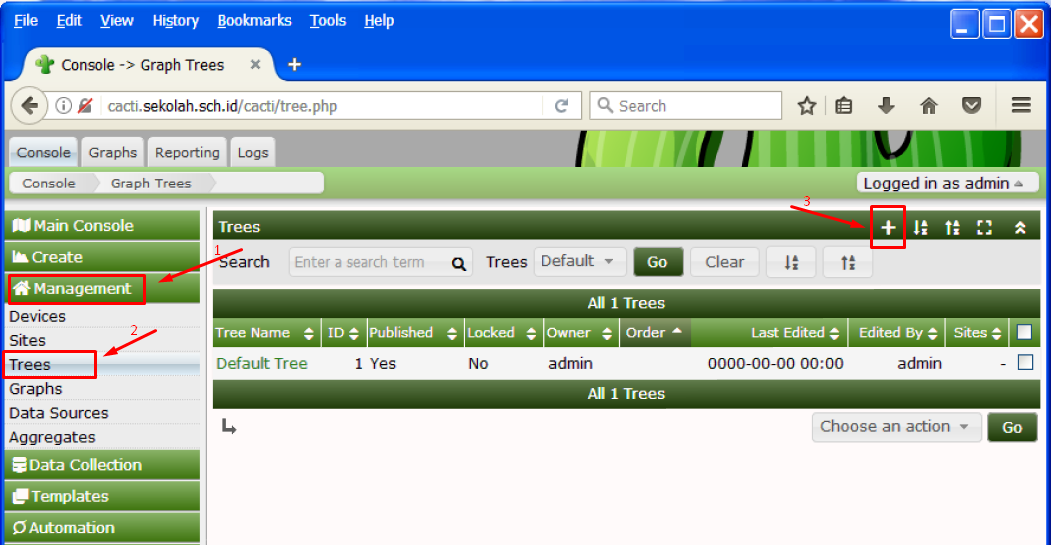
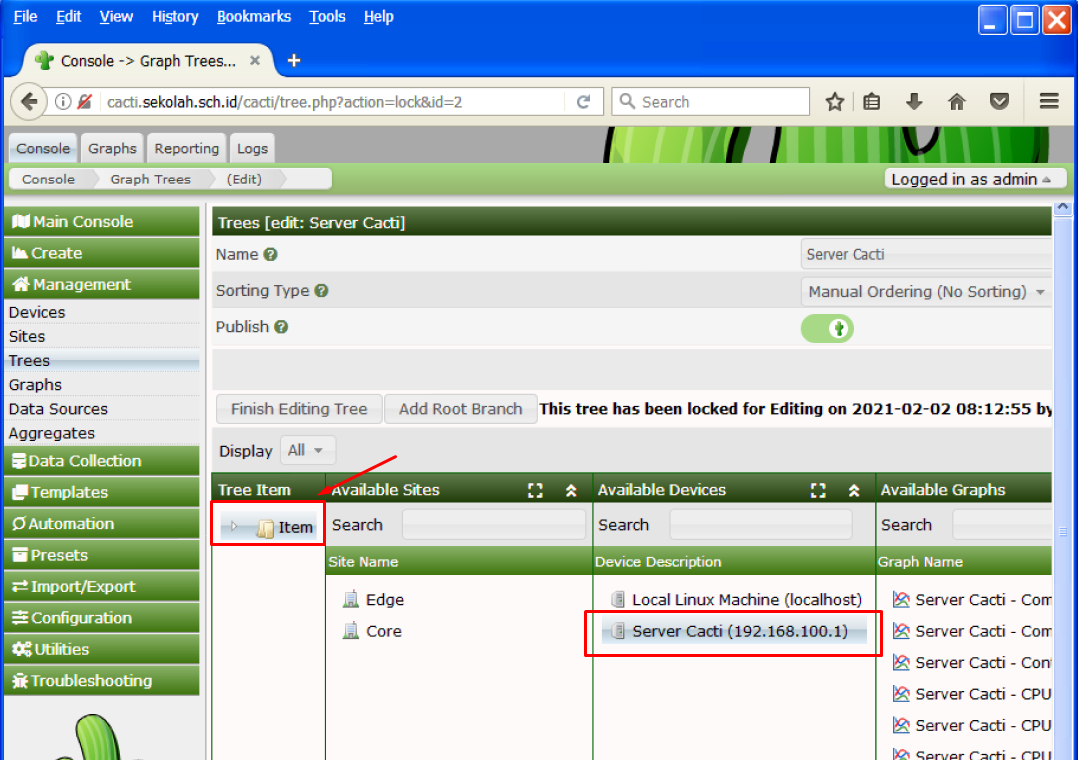
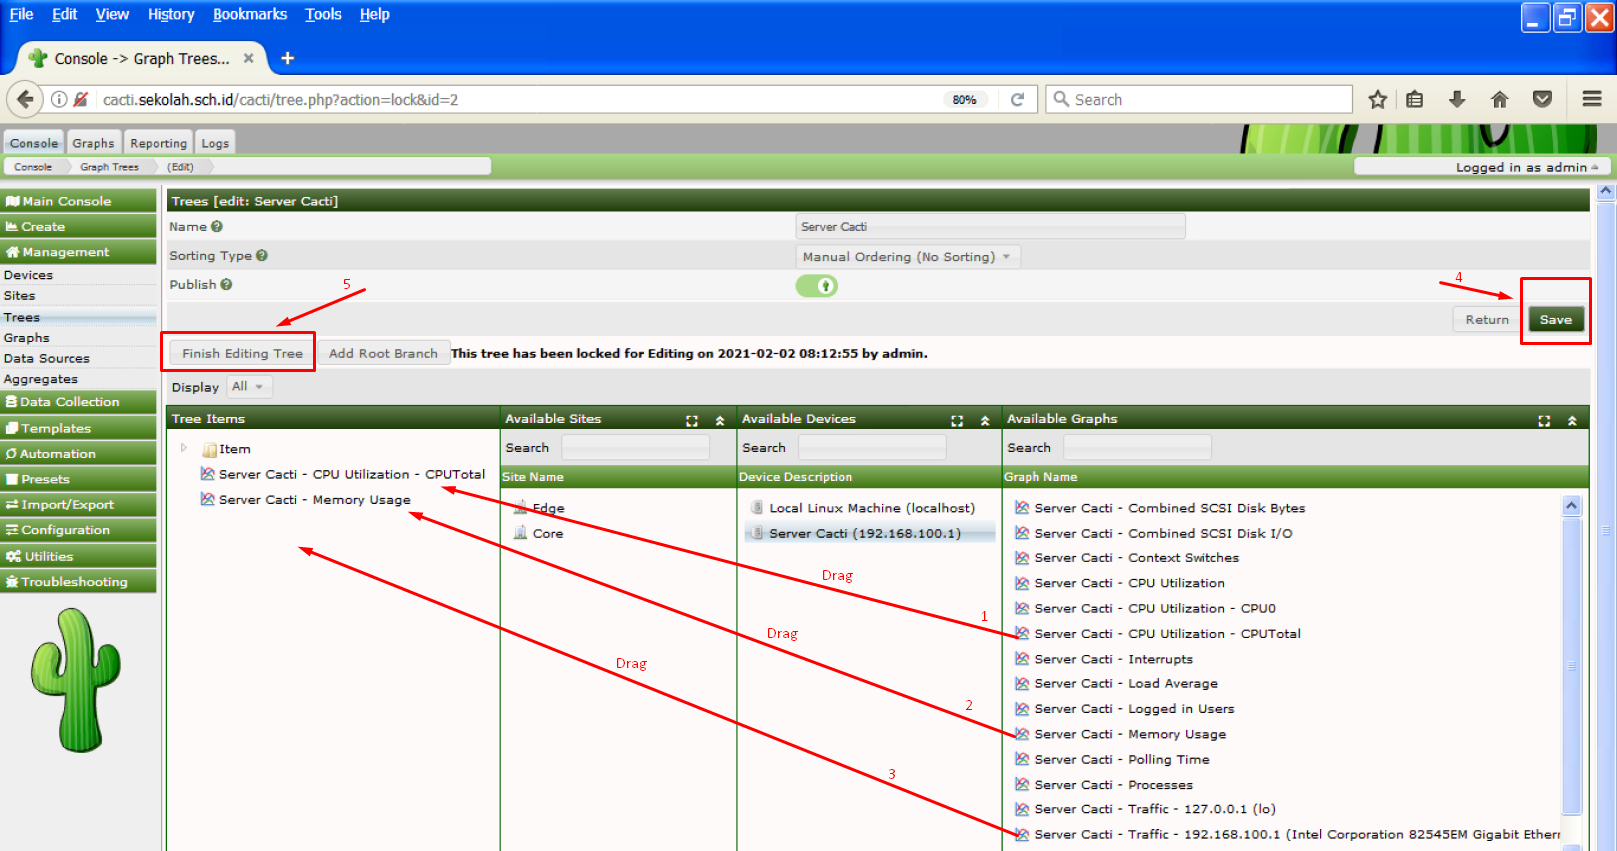
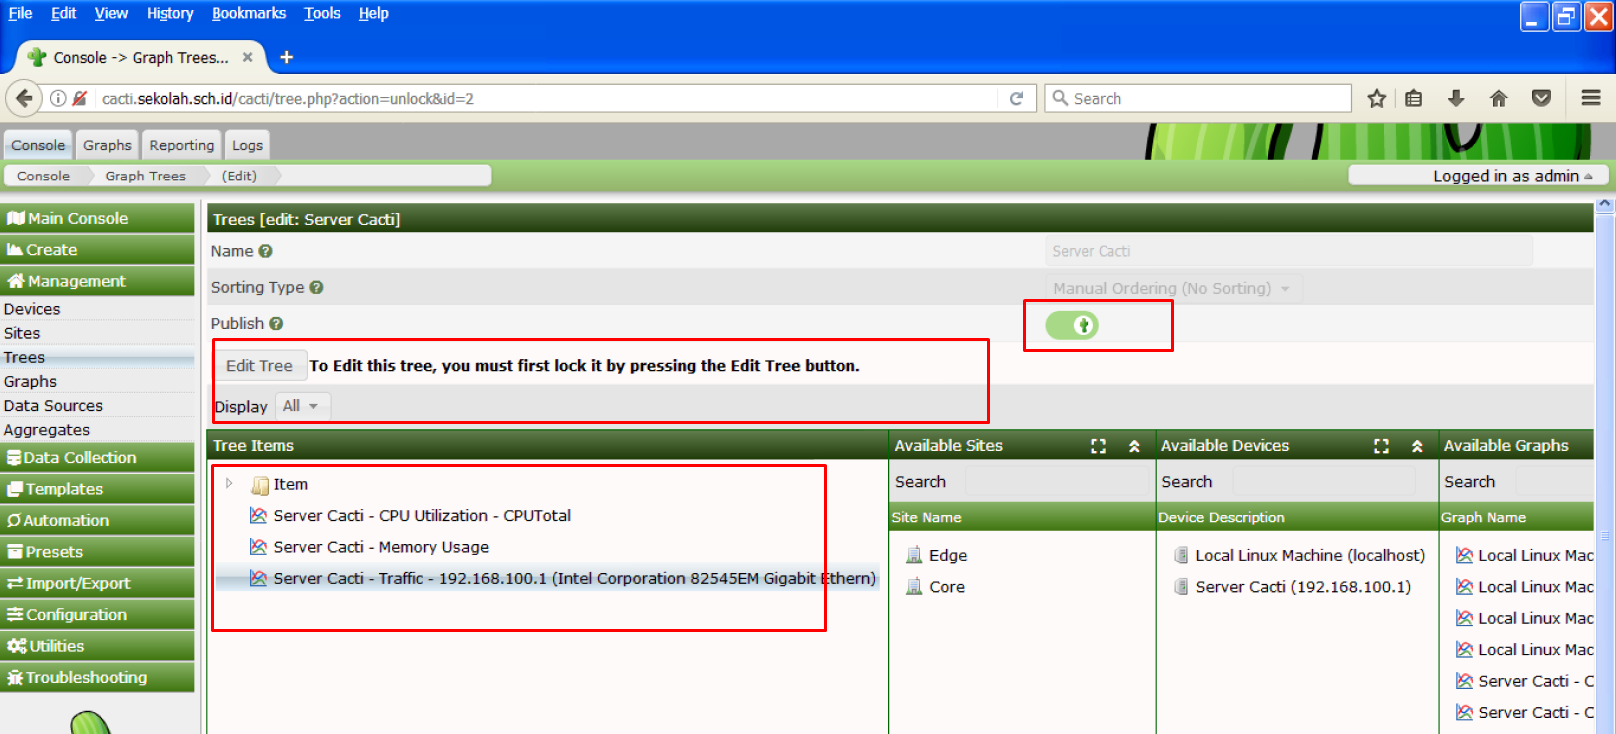
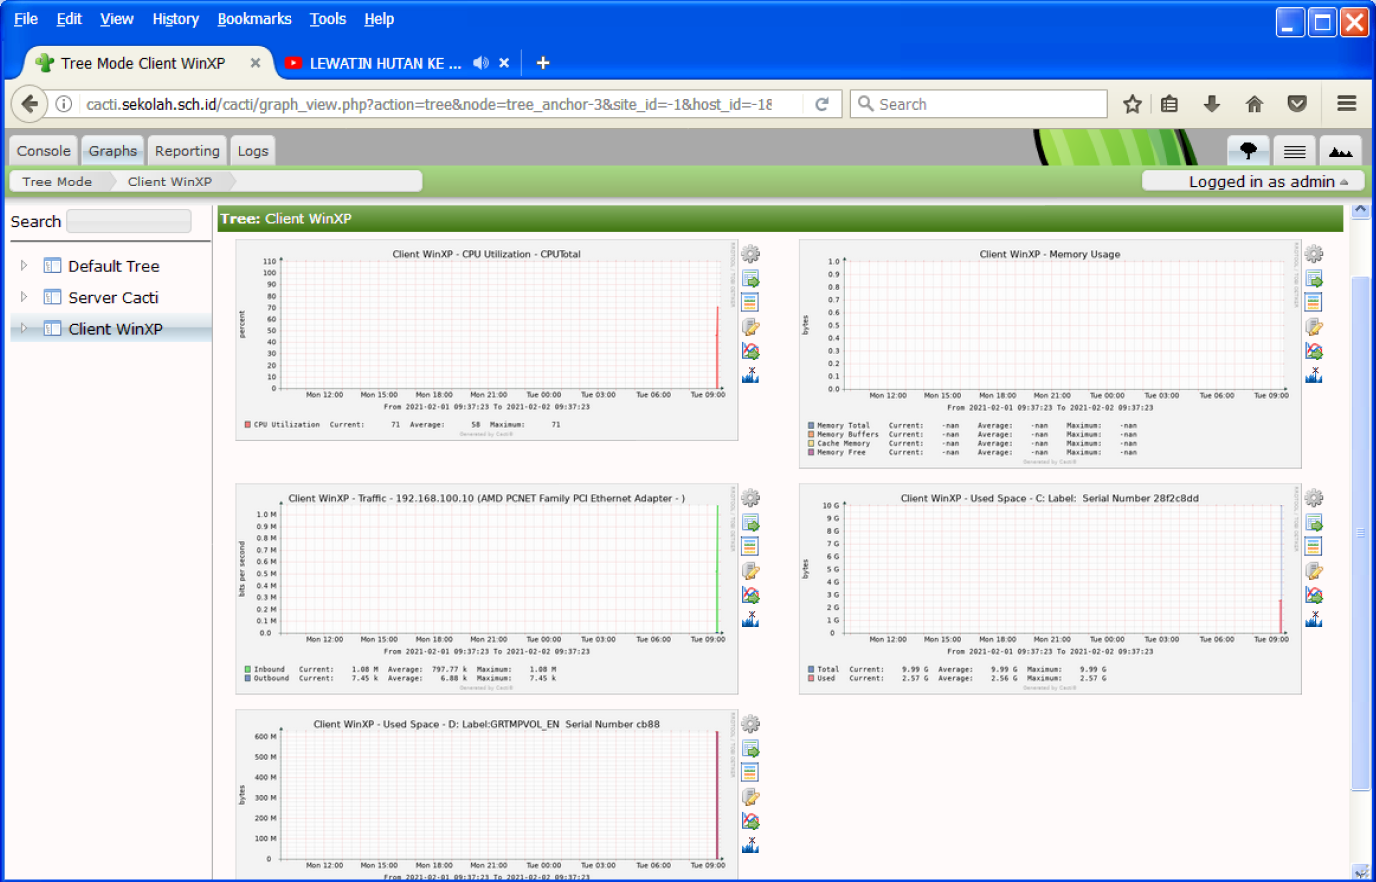
Halaman console/dashboard Cacti setelah kita berhasil login
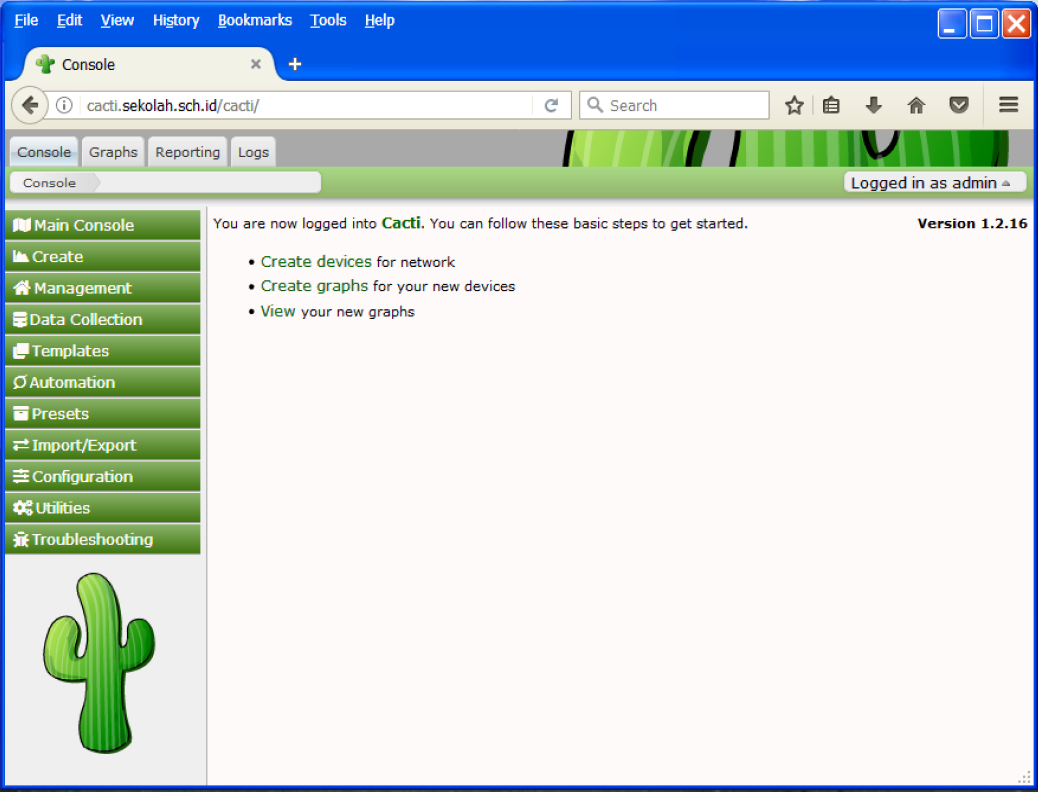
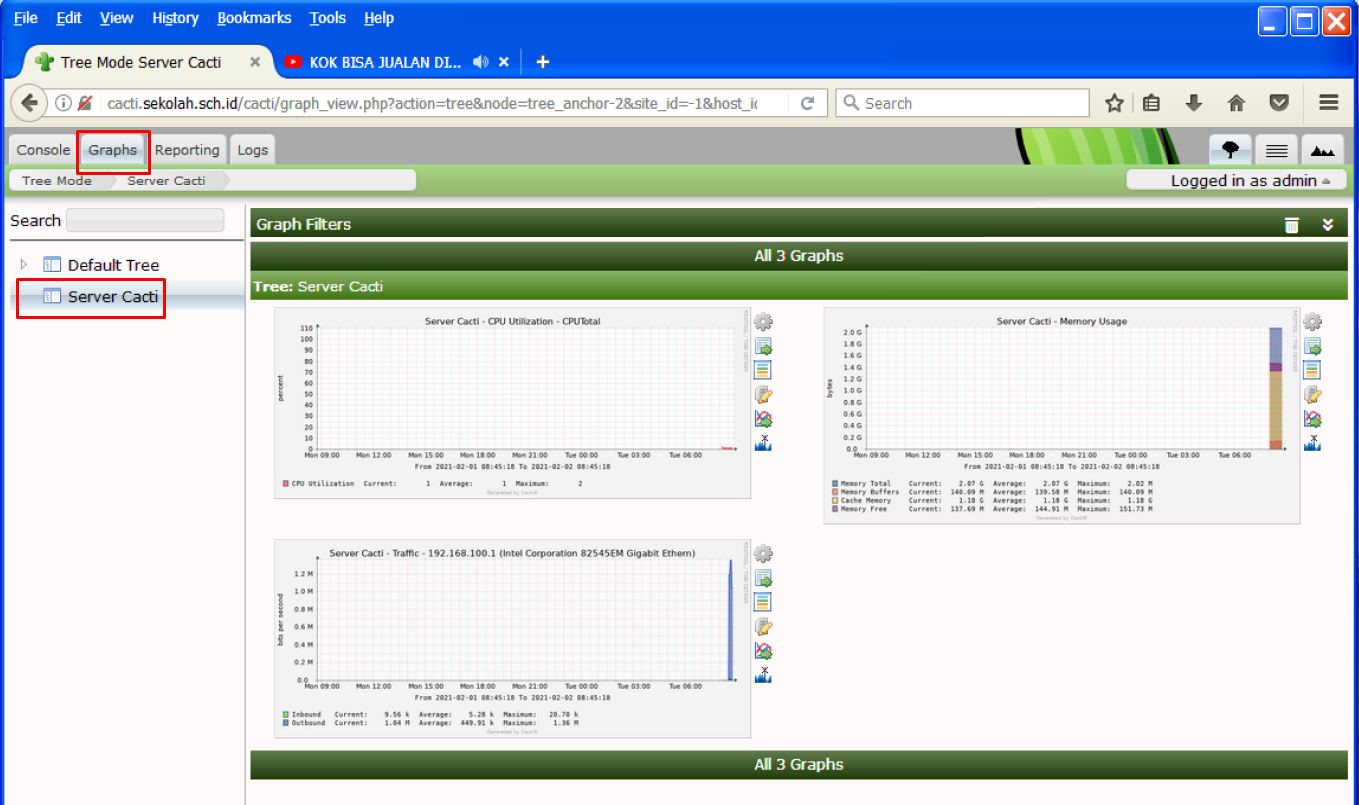
Kita bisa ke menu Graphs >> Default Tree >> Local Linux Machine untuk melihat grafik penggunaan server Cacti.